-
The Front Door – This is one of the hallmarks of curb appeal.
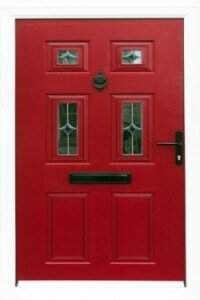 This is one of the hallmarks of curb appeal. Nothing pops on the front of your home like a freshly painted front door. And this is another case where brushing is just not so much fun. To tackle this one, carefully pop the hinge pins, and remove the door from the opening. Hang some plastic over the opening just to keep bugs out of the house. Take the door out to the garage and lay it out on sawhorses.
Once again, a quick scuff and vac, and you are ready to fire up the HVLP. As above, select a good waterborne exterior paint. It is best to pick a higher sheen, semi-gloss or gloss, for appearance and durability. And, have fun with color. The front door is a great place to put a little punch of color.
If you do this in the morning, you can have the door back in the opening by the end of the day. Then, crack a cold beverage and gloat. front door photo
Remember, always take a good 20-30 minutes to break down your gun and clean thoroughly. I usually run a bit of warm water through it upon reassembly. Taking that time to pay homage to the gun that just gained you so much free time is good karma for next time you pull the trigger.
-
TIP: Use Wood Conditioner to Reduce Blotching in Softwoods
Products sold as wood conditioner are washcoats usually made from varnish, though I have seen at least one that is an oil/varnish blend. A washcoat is a finish thinned to five-to-ten percent solids with the appropriate thinner. (Finishes are generally supplied with 20-to-30 percent solids.) In industry, the finish used is usually lacquer thinned with lacquer thinner.
Wood conditioners can be fairly effective on softwoods like the pine shown in the accompanying picture. They aren’t as effective on hardwoods such as cherry.
The purpose of the thinned-finish conditioner is to partially seal the wood, which means to partially stop up the pores so the stain, which can cause a blotchy appearance, can’t penetrate as deeply in those areas that will get darker.
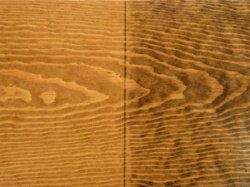
Wood Conditioner on the Left
To use a wood conditioner effectively, it’s important to understand that the directions supplied by almost all brands won’t produce good results. These directions say to apply the stain within two hours, which is before a varnish or oil/varnish blend has time to dry. So the stain mixes with the uncured wood conditioner and still blotches.
To use a wood conditioner effectively you have to give it time to completely dry so the stain can’t penetrate. With lacquer this is 30 minutes or so. But with varnish and oil/varnish blend this is overnight, or at least 6 to 8 hours.
To significantly reduce blotching, apply the wood conditioner wet to the surface of the wood and let it completely dry. Then apply the stain and wipe off the excess. But notice from the example that with less stain penetration, the resulting color is also lighter.
I have no idea why manufacturers give directions that don’t work. The only explanation I can think of is that they believe you want to totally complete a project on a Saturday afternoon, and waiting overnight for the wood conditioner to dry won’t accomplish this.
-
The Twist of Variables
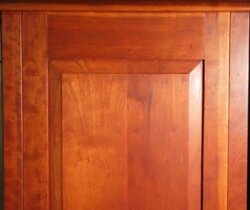 If you engage in the act of finishing at any kind of level, even if just a few meaningful times a year, then you definitely understand that the proof is in the pudding when it comes to creating good finishes. When you get really good at finishing, it almost doesn’t matter whether you are spraying, rolling, brushing, or any combination thereof, the application method is just the medium – the thing standing between you and the result you are after in the finish. The goal is to be able to use whatever means at hand to get the desired result.
Renaissance men in literature were revered for being “skilled in all ways of contending,” and the romantic in me holds the art of finishing to that same standard.
I am lucky to be able to work on all types of interior and exterior finishes and see how they fail, and more importantly, figure out how to fix them. Working on exterior surfaces in the summer gives me the “bulldozer” perspective on finishing. Exterior finishes have to hold up to the elements, which is no small feat. While interior finishes are more Porsche than bulldozer. The sequencing of prep and finishing for exterior trim is not all that different from interior, just different products. But, of course, product drives process. So while similar, everything is different.
Professionally, I am generally either taking finish off or putting it on. Each process comes with a sequence of steps.
What is a finish failure?
On exterior surfaces, it is a finish that literally does not remain intact on the surface. Think flaking or peeling paint. Interior finishes fail in different ways, and it is usually not the fault of the product, but rather the application process. Dramatic interior failures are rare, and more subjective.
If you take finishing seriously enough to continue chasing the dragon of perfection, then you might at times feel like anything short of perfection was a failure, particularly in sprayed finishes.
Number One Cause of Finish Failure…
Without doubt, the biggest way that people create finish failure is by over applying finish: putting too much on at once. It is counterintuitive, I know, and almost like some stubborn vestige of good old fashioned common sense. More paint will hold up better, right? In the old days of old products, sure. And again, it doesn’t matter your particular finishing discipline or interest, the same truths seem to hold.
As products continue to move toward EPA compliance, less is definitely more in the application of finish. Creating thinner layers can really help with adhesion. But can make the glassy lay down you are looking for more elusive – regardless of application tool. In spraying, we refer to the thin coat build technique as “tack coats”. It is easier to get a thin coat of finish to adhere (hold) to a thin layer of itself than to get a heavy coat of the same finish to hang on verticals or edges.
Where Finishes Fail the Most
The number one biggest failure I see in the entire range of paint jobs that failed is the user tendency to apply way too much on the edges of wood surfaces. It is not a conscious decision, it just sort of comes with the lack of control of the application tool and the finish.
It is the “eye” for finishing that I talk so much about. We call them “fat lips” or “fat edges”. On sprayed surfaces, they show up on large surfaces (such as the edges of table tops) as well as narrow surfaces (face frames). They happen both vertically and horizontally.
Side Stepping Failure
Let’s face it, most people don’t really enjoy sanding, and consider finishing a necessary evil at best. I have written in the past in this newsletter about how to trick yourself into learning to love the things you hate about your projects. It is a mind game. The hate of certain aspects of a project is usually rooted in fear. Mastery creates the confidence that eliminates fear.
You are probably expecting me to reveal some esoteric finishing tricks or tips, like some Zen “don’t be there” when failure approaches, but it is really the most incredibly basic practices that create success. Easy to say, harder to do.
Basically, finishing is different every time. And you have to make it the same, by being regimented in everything from your basic habits, to workshop environment and processes. The best finishers I know are highly ritualized, almost instinctual. If something does not look or feel right, they will NOT proceed. Keep in mind, finishes are really only to be appreciated by the tactile and visual senses. It is subjective appeal. Their performance is the only big picture concrete evidence of how you did as the finisher, and believe it or not, that too is detectable by the senses. You can tell when you nailed it. But you have to nail it a few times consistently first.
Here are a couple of habits I notice myself reinforcing in my own work:
- Easing edges - This is where good “edge hold” begins. Breaking, or easing, wood edges is essential to the tactile experience of those who might appreciate your results, and the finish also appreciates having a bit more surface on the edge to hang onto. In a nutshell, those are the reasons to do it. It is detailed work, and has to be done with precision, because those edges define the “lines” that your piece will take, the form. Sometimes just for fun I hack into a maple log with a grinder just to see what form it wants to take. Do this for an hour and you will learn to love the simple act of edge easing as part of your surface preparation ritual on finer pieces of furniture.
- Working from the Edges In – When finishing, whether by brush or sprayer, try focusing on the perimeter of the piece first, then blow down the middle. This is the same mindset for me as a day on the mountain with my snowboard. First couple of runs, I will noodle the edges, then I want to blow right down the middle. Use the whole mountain, with discretion. The finish applied to the edges first helps to “frame” what you will fill in the middle with. Of course, keep it all wet at the same time for uniform laydown.
- Sight it Down - In any phase of finishing (removing undesired finishes, applying new finishes, or scuffing in between coats), always be feeling your surfaces and sighting them down from different angles. In the shop, we use LED inspection lights from all different angles. It is critical to do this constantly so that if you see any issues, you can address them during the limited window of opportunity presented by wet finishes that are trying to lay down.
This is a lot to think about, especially while finishing. That is why it is critical to make them habits, so you don’t have to think about them. It is much more fun when you can just appreciate what is happening at your fingertips.
Plug in some of these habits, even if you already know you should be doing them, and especially if you think you already are.
-
Secret of Sheen – the Second Coat Is Most Important
Secret of Sheen – the Second Coat Is Most Important
The second coat of finish you apply to a project, after you have sanded the first coat smooth, is the most important coat
 because it provides the depth and sheen. Sometimes you can improve the depth with additional coats, but nothing equals the difference obtained from the first to the second.
Most important in this instruction is that you have to sand the first coat smooth to obtain the full effect. If you don’t sand this coat smooth, the roughness will telegraph through the second coat and reduce the depth and lower the sheen.
The surface will also feel rough. A further point to emphasize is that you can’t ever achieve the full effect of a finish with just one coat, no matter how thick you apply it. This rule holds true for all finishes – even oil finishes.
Spray Pattern Heavier on One Side
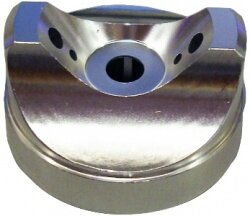
A spray pattern, with all the controls on the spray gun wide open, is supposed to be an even, elongated oval shape. If the
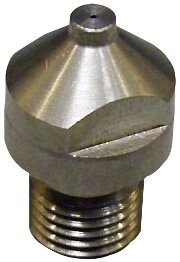 pattern is heavier on one end than the other, the likely cause is that one or more of the holes in the air cap is plugged up. It’s also possible that the fluid nozzle has been damaged.
To determine which, rotate the air cap one-half turn (180 degrees) and spray again. If the disrupted pattern switches sides, the problem is in the air cap. If the pattern stays the same, the problem is the fluid nozzle.
To clean the air cap, soak it in acetone or lacquer thinner to dissolve or soften the obstructing matter, then blow it out with compressed air if you have it. You can also use very small-diameter picks supplied with spray-gun cleaning kits such as the one offered by TheFinishingStore.com (please link)
Be very careful trying to use a toothpick, because it might break off in the hole and be difficult to remove. Above all, you don’t want to use any metal that might damage the hole.
If you determine that the fluid nozzle has been damaged, you will have to replace it. The fluid nozzle and needle are usually sold in sets.
-
Finishing the Deckrail
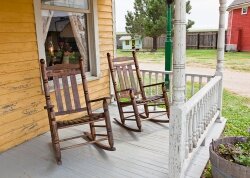 For those with decks that have spindle rail systems…you would probably rather have root canal than brush those spindles out with stain. (See the above before photo.) Here is another case where a quick scuff and vac gets your ready to roll out the HVLP and save yourself a weekend or two.
Deck stain products are low viscosity (thin) and spray very easily through a good turbine system. They are also available in waterborne formulations these days. Even if you are committed to oil stain, the cleanup will take a few more minutes, but think of the pile of hours you are saving by spraying. While you are at it, spray out any lattice work that you may have on the property. Another case of HVLP to the rescue.
-
Waterborne Finishes – Pro and Con
My beginning was in automotive finishing and it remained my career for the next twenty years, then I switched to woodworking and finishing. As with most finishers, I began with the old nitrocellulose lacquers and while they were very friendly to use, they were less than a long-term hard use finish. Then came the pre-catalyzed and post-catalyzed lacquers, a big improvement and they remained relatively user friendly. With the introduction of urethanes and other manmade resins, durability improved even more, but they also had their issues.
Even with modern day post-catalyzed conversion varnishes and so forth there are environmental issues. Changing formulas to meet VOC regulations or in many cases states simply not allowing them to be used, solvent-based products have a very uncertain future.
Today, in my world, I make high end custom furniture and teach finishing, predominantly to hobbyists and semi-professionals. These finishers do not have an environment that allows them to use solvent-based products, especially if it is sprayed. So I began my journey into the world of waterborne finishes. I’ve converted all of my finishing to waterborne products and am glad I did and would never consider going back to solvent based.
At the beginning of the journey, I listened to all of the experts and to be honest, the results were less than desirable. The heavier viscosity of waterborne finishes had everyone saying that you had to use larger needles/nozzles. What I found was that no matter what I did, atomization of the fluid was not good. Reducing the amount of fluid at the gun helped a lot, but I just couldn’t get the ‘butter smooth’ off the gun finish that I was used to with the solvent-based finishes.
So, I closed the books and turned off the computer and it was the best thing for me because I began experimenting with various guns and needle/nozzle settings as well as product viscosity.
Waterborne finishes are typically much thicker and much higher in solid content and since the resins are not dissolved as in a solvent finish, the finish tends to spray ‘coarser’ and is harder to atomize, it also lacks the flow in of any minor overspray. This leads to a gritty feeling finish. It didn’t matter which gun, cup or system I used. I got the same results with the gravity fed, pressure fed, bottom cup, compressed air or turbine driven.
Then, through experimenting I found that dropping the needle/nozzle size to a 1.4 or 1.5 and increasing the fluid, I got a much better atomization and with the reduction of the waterborne finishes, usually up to 10% is allowed. However, it’s still water and water has surface tension, the reason bubbles of water stand on your car or a glass of water can be slightly overfilled. It’s also what allows ‘skeeters’ to walk on water. It’s this surface tension that the smaller needle/nozzles help to break up.
Thinning of the finishes too much can be detrimental. Unlike solvent, what actually seems to happen is that the molecules of finish, which are suspended in water and as stated, not dissolved, tend to be forced further apart. Not only can runs and sags be far more prevalent but the finish simply doesn’t lay out as well.
To understand this, think of a waterborne finish as a zillion tiny BBs on a surface, they have to come together and bond to become a film. The further separated they are, the coarser the film. While a 3% to 5% reduction can help, much over that and I have issues. My standard needle/nozzle is a 1.4 or 1.5, my general rule for viscosity is quite simple. If I can pour the finish in a medium mesh strainer and it flows out at close to the same rate, I’m good to go. While this technique may seem quite antiquated and inaccurate, it has never proven me wrong.
In the case of the smaller needle/nozzle I find that by adjusting the amount of fluid and pressure, I can have a waterborne finish that sprays like a solvent and the results are the same.
Recently, I got my hands on Apollo’s AtomiZer gun. It is a pressure fed, bottom cup gravity fed or pressure line fed and can be used with either compressed air or turbine. I often noticed I could get better atomization from a gravity fed, especially one with a larger cup and the fuller the cup, the better. It was simple, the added weight was helping to push the fluid to the smaller needle/nozzle.
It’s the same basics that allow you to put your thumb over a water hose and spray water, but if you have low water pressure, it’s not a good break up, higher pressure and you can get about any degree of break up you want.
So, I began to look for pressure fed cups, typically what I found was the pressure was limited to bottom cup guns and then only enough pressure was afforded to help lift the fluid. To help eliminate the higher pressures required by the old siphon guns, they had to draw the fluid from the cup by suction created from a large volume of air moving through the gun.
Then enter the AtomiZer, problem solved. Apollo finally figured it out. Waterborne finishes, push that finish through a smaller orifice and it sprays. Much like an air assisted airless or the commercial sprayers for paints, it’s that added finish push that will rewrite how waterborne finishes are applied, not to mention the precision of the gun. While many systems will spray waterborne, this technology that Apollo has incorporated will change anyone’s mind who has ever pulled the trigger on a waterborne finish.
Waterborne FAQ and Issues
You have to be careful of any finish left on a tip between coats, it sets up hard and fast. Once set, some M.E.K. is all I have found to clean it. I simply drape a wet cloth over the gun tip between coats.
You want to use a Teflon lined cup. Nylon isn’t bad but with aluminum and steel, the finish likes to hang on the sides and can semi-setup and contaminate the finish.
Waterborne finishes are typically water clear and afford no slight amber tint or warming of the finish like a solvent base finish does which is more of a reaction of the wood and the solvents. I find a quick seal coat of 1 lb. cut of either a blond or amber shellac cures that.
Waterborne finishes are more expensive but when you compare solids content it isn’t really. Add to that fire insurance, employee workman’s comp insurance, and the whole environmental issue, not to mention hazmat shipping, it’s actually cheaper.
Overspray, while minimal can be an issue in multi-piece application. Unless you have adequate air movement to remove any airborne particles, you can get overspray settling in the finish and because of it’s quick set, it will ‘grit’ the finish. My solution is to spray multiple parts toward the exhaust, meaning I spray the farthest distance from the fan, moving toward it and tacking my pieces as I move forward. Remember, unlike solvent based, waterborne does not dissolve itself.
If a finish is to be rubbed out, with micro-mesh or other means, if you go through one coat into the next you can get ‘ghosting’. My solution to this is what I call a double or back-to-back final coat, meaning I typically will spray a light first coat, just to get finish on the surface. As soon as it tacks, I apply a full wet coat. Once dry, I do my mid-coat scuff sand with 320 grit, then apply a full second coat and again a more aggressive mid-coat sanding. Then I apply another full wet coat and as soon as it tacks I apply another full wet coat
While one coat of waterborne will not dissolve the other, it does have enough burn-in to allow for a chemical adhesion. So the objective here is to catch one coat before it is fully set and apply the second, they then bond together to form one heavy film which has yet to give me a ghosting issue.
On the topic of waterborne and rubbing, having overcome the ghosting issue, I personally find the non-dissolving properties are a blessing. I have no ‘shrink-back’ meaning when I do a mid-coat sanding to a glass smooth surface, the next coat isn’t going to soften it or disturb the surface. After a day or two cure I can sand and rub, wet or dry. Six months or even two years later, the piece I sent out the door was the same.
The heavier solids allow for better grain filling properties and it doesn’t shrink back, so for me the ‘what you see is what you get’ is a super plus.
One last thing, waterborne finishes often lack that warm butter feel solvents offer. It is because there is always a slight amount of overspray. A quick rub with a paper bag or some brown craft paper and it’s like glass.
You will also find chemical and wear resistance is far better.
-
TIP: How to Choose a Stain for Fade Resistance
Pigment resists fading. Dye fades quickly in sunlight, including sunlight coming through a window. So when staining any object that will receive direct sunlight, always use stain containing only pigment.
Because pigment settles and dye doesn’t, you can easily test for pigment or dye by dipping a light colored stirring stick to the bottom of a can of stain after you have given all the pigment enough time to settle (usually a week or longer).
If the upper part of the stick is colored, the stain contains dye. If you can lift solid material off the bottom of the can, the stain contains pigment. If both, the stain contains both pigment and dye.
-
How to Choose a Finish: Part II
For an overview of choosing a finish please refer to “How to Choose a Finish: Part I.” To better understand finishes and their differences, it’s very helpful to put them into categories by the way they cure. Read the rest of the story »
-
How to Choose a Finish: Part I
The first step in finishing a project (beyond preparing the wood, of course) is to choose the finish you want to use. In fact, it’s wise to make this choice even before starting on the project because it may influence the wood you choose. Read the rest of the story »
-
Caring for Natural Bristle Brushes used with Water Based Paints
 1. Always wash a new brush before you use it. I use Dawn Liquid Detergent in the shop, but you can use most any detergent that doesn’t contain bleach. Bleach will dry out your bristles, just like your hair. I squeeze the detergent into the palm of my hand and then carefully mash my brush bristles into the soap. Rinse with cool water. This will help remove any loose bristles before you begin to paint. This step will prevent those pesky hairs from ending up on your canvas, chair, or trim. Once you have washed your brush smack it on the palm of your hand or on a tabletop to loosen any stray hairs.
2. When you finish painting for the day try to remove the majority of the paint from the brush onto your work surface or a rag before you start to clean the brush. The less paint in the brush, the easier it will be to clean. Rinse the brush holding it by the handle with the brush end pointing down into the water stream. Do not hold the brush head under the water with the bristles pointing up as this will push the paint down into the brush. Pour some detergent into the palm of your hand and gently mash the bristles into the soap, working them up into the brush. Repeat this step till the soapsuds are not the color of the paint and the water runs clear when you rinse out the soap.
3. Always condition your natural bristle brushes after washing. Once my brush has been washed I squirt a small amount of inexpensive hair conditioner into my palm and work it into the brush just like I do when I condition my own hair. Rinse with cool water and shape the brush.
4. Hang your brushes to dry. Do not dry your brushes upside down, i.e. brush head up and handle down. If there is any residual paint in the brush it will settle down into the bristles close to the ferrule and will eventually cause the bristles to break from the build up. I prefer to hang my brushes over the sink to dry. You can use some wire to create “hooks” and hang the brushes off the faucet, thus allowing any water to drip into the sink( see photo). Once dry, the brushes are returned to the brush board (see photo). For my fine art natural bristle brushes, I wash them as I have described and lay them on a shop towel to dry. Once dry they are returned to their proper containers for storage.


